Fiber is surprisingly durable. Most cables boast a pull rating exceeding 200lbs and can survive installed bend radiuses smaller than 5mm. Couple this with constructions supporting wide temperature ratings and harsh outdoor weather and it’s no wonder fiber has become the medium of choice for high-speed networking and telecommunications.
But what happens when the cable doesn’t pass signal? Or even worse, it did pass signal and now it won’t? Or perhaps the network speed isn’t up to spec?
These problems are all commonly experienced in fiber optic installations and, often, they’re fixed with basic troubleshooting and service.
This article explores the problems and troubleshooting steps for a typical fiber optic installation. But before we dive into the actions, it’s important to first understand the construction and implementation of fiber cable and connectors.
Fiber is Built for Clean Connections
Fiber optic strands are incredibly small. I mean really, really small. Single mode fiber relies on a core diameter of 9 microns (or µm) and multimode fiber relies on a core diameter of 50 microns. For perspective, human hairs average between 17 and 180 microns. That’s tiny…
Fiber-based systems rely on the clean transmission of light over those small optical strands and any contamination can disrupt the signal leading to loss and intermittent (or complete lack of) performance. The below image shows optical lenses affected by common contaminants and installation damage when viewed through a microscope.

And contaminants aren’t the only issue. Fiber installed in uncontrolled environments can exasperate issues caused by dirt, oil, moisture and other detritus. For example, temperature fluctuations, including those from the heat output of the optical port on electronics, can lead to small misalignments that have a significant impact on signal loss. And, frustratingly, these misalignments often fluctuate with the temperature creating intermittent signal loss.
When integrating fiber-based systems, it’s imperative that connectors, electronic ports, and any inline installation accessories such as patch panels, couplers, wallplates and adapters are clean to avoid loss from reflectance and signal dispersion within the fiber link.
Cleaning Optical Lenses and Ports
So what’s an integrator to do? Well, let’s start by discussing the optical connections.
 Manufacturers are keenly aware contaminants will detrimentally affect a fiber-based system and dust caps are a standard feature on connectors, pre-terminated cables, couplers, electronics and other installation essentials. Dust caps should be kept in place as long as possible.
But what if you’re servicing a retrofit with existing, pre-installed equipment? Or if the environment is particularly dusty, dirty or outdoors? Dust caps can’t help an already compromised connection.
A click-style, also known as pen-style, cleaning tool is essential for any installer. Click cleaners use a special dust-free full contact cleaning process to remove contaminants on both fiber connectors and ports. They’re easy to use — simply “click” them on the connector and port ferrule. The only catch is they’re specific to 1.25mm and 2.5mm ferrule sizes so you’ll likely need one for LC connections and one for SC, FC, and ST connections.
If a click cleaner isn’t available, traditional alcohol, wipes and swabs can and should be used.
Other Fixes for Signal Issues
If you’ve verified your connections are clean and your installation is within spec, the below steps will often solve fiber connection and performance issues.
- Check connection polarity. If using a duplex connection (two strands), swap the connections. Most fiber signals rely on separate transmit and receive paths.
- Check your connectors. Is a connector loose? Verifying the connector termination with a VFL tester and re-terminating solves the issue.
- Check your connections. Is a connection or patch point loose ? How many inline connections are in the run? Too many connections can cause too much signal loss.
- Clean your connections. As we discussed above, remove dirt, dust and oil from fingerprints with pen-style cleaners or alcohol wipes.
- Check for breaks. Identify cable damage using a VFL tester. If identified, re-splice the cable.
- Check your cable distance. Multimode fiber has a typical maximum distance of 300m / 1000 feet. Longer runs require single mode fiber.
- Check compatibility. Some devices, especially AV over fiber extenders, are specific to either multimode or single mode fiber. Ensure the installed cable matches the device compatibility.
Testing for Signal Issues
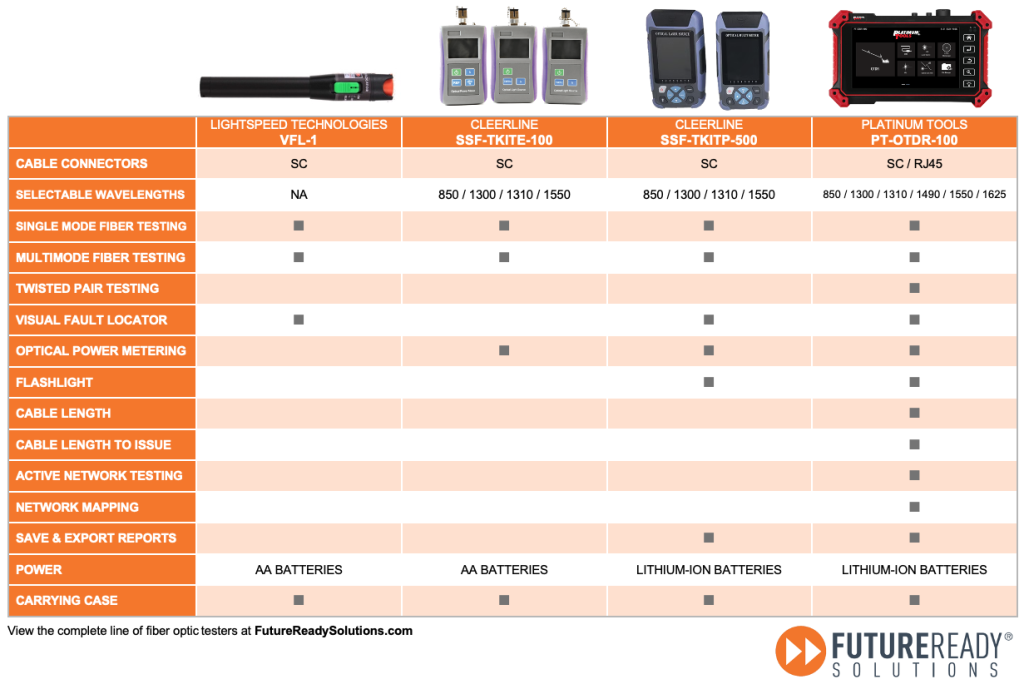
As we’ve discussed in previous articles, Future Ready Solutions offers a wide array of fiber optic testing equipment that will quantify signal loss and measure cable length to fault.
The below chart compares the popular fiber optic testers and additional information is available online at FutureReadySolutions.com or by emailing info@futurereadysolutions.com.